Archive for the ‘hobby’ Category

Uzebox – AVR Gaming console

UZEBOX

So lately I have been fiddling with Uzebox. It’s a game console from just a ATMega644 mcu and a AD725 (RGB-to-NTSC converter) chip. Thats the whole idea. The RGB signal is created by a manual 3:3:2 resistor based DAC, and audio is pure PWM signal.

The awesome part of this console is the “kernel”, written by Uze (Alec Bourque), which has several video modes available, and a 4 channel audio mixer, all done in interrupts, so that when you code stuff to this console, you don’t have to think about the clock cycles of your code, as the interrupt will always update the screen and audio output “behind the scenes”.

The project is now also supported well by a small but great community, that has helped Uzebox with more video modes, games, and even a realtime emulator!

I have made a few additions to the emulator (uzem), adding threading to split the SDL screen blitting from the MCU emulation in seperate threads, a funny RAM/Progmem visualizer, and a SD card FAT16 emulator. (The emulator already had SD card emulation, but I have added the FAT16 emulation)

You can buy yourself a Uzebox at Adafruit, or just download the emulator from the code.google.com repository.

Games and demos(with or without source code) can be downloaded from the wiki.

My additions can be found in the SVN repo.

DMX Light control system

Every year, I team up with raider.no to arrange a party in Hurdalen, or around the Oslo area. And one of the things that is important for us (especially me and William), is to create a cool opening show, using our own innovative technology. We don’t have a lot of money in the organization, so we tend to also develop stuff that already exists.

This year, we wanted to do the timing of the show entirely in our own system, as we weren’t satisfied with the Avolites Pearl systems own “show timing” system.

So we split up the task in two daemons and a GUI. The two daemons are written in C, and the GUI in Perl (using the Catalyst Framework).
The first deamon is the “DMX daemon”, which handles existing DMX data from the Pearl mixer as the rest of the night will be run from this board. This is transferred via network over the ArtNet protocol. It also listens for our own udp DMX-commands, which includes simple operations like, fade (linear), blink, subtract, add, etc. These functions allows external scripts and programs to send simple commands to control the lights. For example “fade channel 1 from 0 to 255 in 2 seconds”. Which would then automatically execute, without the client having do anything more. You can also group together a bunch of actions in a “transaction”, and then have it execute as soon as you send the “end transaction” command. The resulting DMX data is sent to the Enttec DMX dongle connected to this computer. The system is so lightweight, that there was no noticeable delay from using ArtNet->DMXDaemon->EnttecDongle over network, than using the direct DMX output from the board. The nice thing is that, if we want, the show daemon can forcibly stop all data from the Pearl mixer, or even alter the data using add/subtract/max/min commands.

The next daemon is the show daemon, this takes complete scripted shows from the database (created by the GUI), and converts them to commands to be sent to the DMX daemon. This daemon uses (lib)jackd2 to fire events at the exact time according to the sound file playing in a external program like Ardour, which sends timecodes via jackd. The show daemon has functions to group together effects that will be executed at specific timestamps.

Here’s a link to a overview of how we wired it all up for the show.

The whole system is kept open-source at github.

Simple ORM php-library for mySQL

I have been using Akelos both for professional and personal uses for a long time now. But sometimes I only need the ORM part of Akelos, and not the whole MVC shebang. So for a while ago, I made a ~40 lines php script that abstracted mysql queries in a easy to use class, much alike how Akelos’ AKActiveRecord works. But just much much simpler.

Then for a few days ago I thought, why not extend (rewrite) it, and add support for relations and serialization, etc; but still keep it simple enough to be one single small include for my small projects, with only two lines of configuration needed?

So here is initial version under LGPL license: SimpleActiveRecord-v0.1.tar.gz.

In the tarball above, you will find everything you need in the file “simpleactiverecord.php”, but included is also a test suite using the simpletest library.

To use the orm functions, all you need is the simpleactiverecord.php. But if you are going to extend it, or check that all the functionality is intact, you can use the included tests to check that the all the desired functionality is intact after your changes. To run the tests, just invoke ./test.sh from the command line. (if you are using debian/ubuntu, you need to have the php-cli package installed to do this)

To begin; I will add some phpDoc in the future! It’s not a finished project.

Examples

Here are some examples and explanations of how you can use this simple ORM:

First the mysql database I use for these examples:

CREATE TABLE `users` (
  `id` BIGINT(20) NOT NULL AUTO_INCREMENT,
  `customer_id` INT(11) NOT NULL,
  `username` VARCHAR(50) DEFAULT NULL,
  `meta` text,
  PRIMARY KEY (`id`),
  KEY `customer_id` (`customer_id`)
);
INSERT INTO `users` VALUES (1,1,'someuser','N;');
 
CREATE TABLE `customers` (
  `id` BIGINT(20) NOT NULL AUTO_INCREMENT,
  `name` VARCHAR(100) DEFAULT NULL,
  PRIMARY KEY (`id`)
);
INSERT INTO `customers` VALUES (1,'CustomerName 1');
 
CREATE TABLE `blogposts` (
  `id` BIGINT(20) NOT NULL AUTO_INCREMENT,
  `user_id` BIGINT(20) DEFAULT NULL,
  `title` VARCHAR(255) DEFAULT NULL,
  `body` text,
  `created_at` datetime DEFAULT NULL,
  `updated_at` TIMESTAMP NOT NULL DEFAULT CURRENT_TIMESTAMP ON UPDATE CURRENT_TIMESTAMP,
  PRIMARY KEY (`id`),
  KEY `user_id` (`user_id`)
);
INSERT INTO `blogposts` VALUES (1,1,'Blogpost 1','This is my first blog',NULL,'2010-08-20 12:54:02'),(2,1,'Blogpost 2','This is my second blog',NULL,'2010-08-20 12:54:09');

And then some code to test the functionality:

<?
 
require_once('simpleactiverecord.php');
 
class User extends SimpleActiveRecord {
	public $has_many = array( 'blogposts' => 'Blogpost' );
	public $belongs_to = array( 'customer' => 'Customer' );
	public $serialize = 'meta';
}
 
class Customer extends SimpleActiveRecord {
	public $has_many = array( 'users' => 'User' );
}
 
class Blogpost extends SimpleActiveRecord {
	public $belongs_to = array( 'user' => 'User' );
}
 
SimpleDbAdapterWrapper::setAdapter('mysqlAdapter');
SimpleDbAdapterWrapper::connect('127.0.0.1', 'ormtest', 'passord', 'ormtestdb');
 
$user = new User('username', 'someuser');
/* or $user->findFirstBy('field', 'value'); */
 
print "Username: " . $user->username . "\n";
print "Customer: " . $user->customer->name . "\n\n";
 
foreach ($user->blogposts as $blogpost) {
	// Dumps the whole blogpost object
	print $blogpost;
 
	// Or fetch data from it manually:
	print "Blog title: " . $blogpost->title . "\n";
	print "Blog written by: " . $blogpost->user->username . "\n";
	print "---\n";
}
 
?>

This gave me the follwoing output:

Username: someuser
Customer: CustomerName 1

Blogpost(1)
	Id: 1
	User_id: 1
	Title: Blogpost 1
	Body: This is my first blog
	Created_at:
	Updated_at: 2010-08-20 14:54:02
	User: (reference to a User object)
Blog title: Blogpost 1
Blog written by: someuser
---
Blogpost(2)
	Id: 2
	User_id: 1
	Title: Blogpost 2
	Body: This is my second blog
	Created_at:
	Updated_at: 2010-08-20 14:54:09
	User: (reference to a User object)
Blog title: Blogpost 2
Blog written by: someuser
---

Saving / Updating

If I want to change something in for user with id 1 I can simply write:

$user = new User(1);
$user->username = 'newusername';
$user->save();

This will update sql with the new values of your user object.

Relations

As you can see in the example; we have three databases with relations to eachother. To relate the models to eachother, all you have to do is to define the relationship in the ‘magic’ variables called $belongs_to and $has_many. In the example, I have related the Customer model to the User model, by saying “$has_many = array(‘users’ => ‘User’);” which means that the User table has a column called customer_id, which points to the “Customer” model. This means that if you have a Customer object, you can access an array of all the users to this customer, by using the $customerobject->users property. This will automatically “lazy load” all the users for your selected customer.

Custom table names or field names

If your users table haven’t defined the customer id field as “customer_id” which was automatically guessed, you can define it by saying: “var $has_many = array(‘users:custom_customer_id’ => ‘User’);”. Now instead of searching for customer_id in the Users table, it will search for the correct customer id in the custom_customer_id field of the users table. The same goes to the $belongs_to relations.

Also, if you do not define the primary key of your tables as ‘id’. Maybe you have your table’s primary key named ‘user_id’, you can define this in your model definition. The same goes if you define for example a User class, but the table is names ‘my_users’; you can explicitly define both like this:

class User extends SimpleActiveRecord {
  public $tableName = 'my_users';
  public $primaryKey = 'user_id';
}

Serialization

A nifty feature of this library is also automatic serialization. As you can see in the definition of the User class in the first example, i have told the library that the field ‘meta’ is a serialized field. This means that it wil automatically be serialized with php’s “serialize()” function before it is saved to SQL. This enables you to add php variables and objects to your object for later use when you load the object from sql again. Let me give an example:

$user = new User(1);
$user->meta['is_logged_in'] = 1;
$user->meta['something_useful'] = array('this', 'is', 'useful', 'information', 'about', 'someuser');
$user->save();

This will then save the serialized content of meta to sql. The following SQL query happened behind the curtains:

UPDATE `users` SET `customer_id` = 1, `username` = 'someuser', `meta` = 'a:2:{s:12:\"is_logged_in\";i:1;s:16:\"something_useful\";a:6:{i:0;s:4:\"this\";i:1;s:2:\"is\";i:2;s:6:\"useful\";i:3;s:11:\"information\";i:4;s:5:\"about\";i:5;s:8:\"someuser\";}}' WHERE `id` = 1 LIMIT 1

If we load user from sql again now and print the meta field:

$user = new User(1);
print_r($user->meta);

We can see that it has correctly remembered the structure of our meta variable.

Array
(
    [is_logged_in] => 1
    [something_useful] => Array
        (
            [0] => this
            [1] => is
            [2] => useful
            [3] => information
            [4] => about
            [5] => someuser
        )

)

You can also have more than one serialized field by specifying it in the class definition:

public $serialize = 'meta,metafield2';

or

public $serialize = array('meta', 'metafield2');

Setting / getting multiple keys at once

To set a whole bunch of variables in the object at once, you can use setAttributes(). This function sets the corresponding fields to the values in the associated array given as argument:

$user->setAttributes(array( 'name' => 'newname', 'customer_id' => 2 ));
// or fetch all data from a model as an array:
print_r($user->getAttributes());

Searches

You can also search for specific fields, or specify a WHERE statement manually. For example. If you are searching for all customers with a specific customer name, you can do the following:
$customer = new Customer();
$customers = $customer->findBy(‘name’, ‘CustomerName’);
print_r($customers);

This would give you an array of Customer objects. You probably notice that I have defined $customer as an empty instance of the Customer object, before using it to find the customers and wonered why.. The reason for this is that PHP < 5.3.0 doesn’t support late static bindings. And I would like to support < 5.3.0 since a lot of distributions haven’t moved to 5.3.x yet.

There is also a function called findFirstBy(), which works in a similar matter, but gives you only 1 object.

The find() and findFirst() functions allow you to define the full WHERE clause yourself. But remember to escape your data when you use these two functions. These are the only two functions that does not automatically escape your input.

Model code

Inside your model (the class definition of your table), you should add functions to handle tasks for your model that is more advanced than setting a variable and saving. For example in a User model, you might want to encrypt the users password just before the object is saved to sql.

Things like this can be done by defining beforeSave(), afterLoad() and beforeDestroy() functions in your model. They do as you think they do. And if your beforeSave() or beforeDestroy() functions return a false boolean, the save- or delete-operation will be aborted!

Exceptions

The class only has two custom exceptions, SqlErrorException and InvalidDbAdapterException. I think the names describes themselves pretty good.
Remember to catch them. InvalidDbAdapterException usually only arrives if your dbAdapter is uncomplete. You should not be able to get this error with for the included mysqlAdapter.

Thats all folks!

Until I add phpDoc documentation, there’s only one way to learn about all the features included. There’s a lot of functions that is not mentioned here. But you can easily find about them by reading the source code. It shouldn’t be all too cryptic to understand.

Programming in Akelos

For some while I have been using the Akelos library for MVC development within PHP. The reason I like this library over other well-known libraries like Zend Framework, CakePHP etc, is that this library is very much coded with “Convension over configuration” which means that you don’t have to over-configure everything. And it’s easy to learn new people how to use it. (more…)

Simple Perl based Icecast clone

This is acctually a mini project I did a while ago, but I thought I could write a small post about it here, and give out the source code.

The reason I did this, was because I used icecast, and had 5 streams up with a lot of users, but sometimes you would get sound from other streams on the same server, or old sound in the middle of the stream. I tried googling after other people with the same problems as me. But found nothing. So I thought; it’s quite simple software, how hard can it be to make a stable myself?

So first I made a proof-of-concept perl script to receive data, and send out to several listeners. Worked great at first try. Only a minior problems. If I paused the stream on one client, the whole server started waiting for that one listener, before sending any more data to all the other listeners. (more about this later) The other problem was that I didn’t have any in-stream “title” support.

The reason the stream stopped when one of the clients stopped listening for data (and blocked further data), is that I was sending data with a blocking socket. Now I tried googling about how to _send_ nonblocking, but coulnd’t find anything. So I made my own little workaround. (someone please give me a better solution)

Instead of:

$sock->syswrite($data)

I wrote a new send subroutine using IO::Select to check if the client is ready for data:

sub send {
	my $self = shift;
	my $sock = $self->{'sock'};
	my $data = shift;
 
	my $select = IO::Select->new;
	$select->add($sock);
	if ($select->can_write(0)) {
		return $sock->syswrite($data);
	} else {
		return 0;
	}
}

This finally did the work for me. The “send()” subroutine now returns how many bytes it sent to the client, and if it couldn’t send any, then it returns zero of course.

Then over to the problem of sending title updates inside the stream. I googled this and found a nice informative page about Shoutcast MetaData.  To bring it into a short explanation; if the client supports shoutcast metadata, it sends the following request header “Icy-MetaData:1” to inform the server that it knows about metadata. Then the server, my script, sends “icy-metaint: 123” back in the response header, where “123” is the amount of mp3 bytes before a metadata string should arrive. After exactly 123 (or whatever the server decides) bytes, the server sends a byte containing information about how long the metadata block is, and then the metadata right after. The “length byte” must be multiplied by 16 to get the real length of the metadata string. So the largest metadata string possible would be 4096 bytes long. Just after the metadata, the mp3 data continues as usual. Usually you won’t send the title data each time the metaint-counter goes around. You’re probably good by sending zero length metadata (just sending a ‘\0’ byte as metadata-length) all the time, until the title actually changes.

So at this time I rewrote the script, and mode it more module based, and added support for several streams, and yaml configuration file for access control, and some status pages, using TemplateToolkit.

So anyways, the script is still in early beta stage, but it should work fluently. It did however seem that the title-data got out of sync after about a day of listening to a stream, until you reconnected. Can’t seem to understand how it would get out of sync, unless a malformed tcp packet would arrive. So either I was testing it with a really crappy internet connection that time, or there is a bug berried deep in the simple code. You are free to have fun with the script, and tell me whats wrong. I also think it’s still full of debug printing. But I have already warned you, this is still in the proof of concept “whack-some-shit-together” stage. I’ts just one of those projects that ends up collecting dust.

If you fire the script up, and go to http://127.0.0.1:8001/ it should give you a list of the current connected streams. Also http://127.0.0.1:8001/xml should give you xml output of current streams. I’ve been using oddcast to send icecast stream to it.

Here’s the full script: perlcast.tar

Big timecode display

So, in the last blog entry I told you about the perl DMX backend that we are doing for the party project of ours.

We have concluded that we will have a bitchin’ intro show. And it will be timecode controlled. Every little audio / DMX / Video effect will be timed to the millisecond.

To do this, we have (for now) concluded that we will use Ardour as the audio platform, and use jackd as the timecode server.

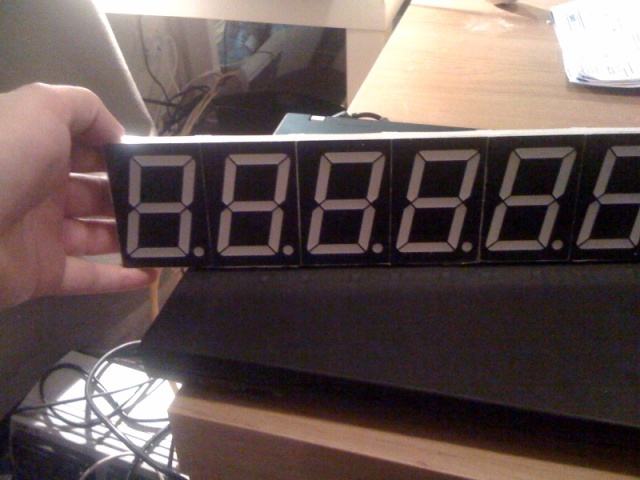
The nice part about this, is that it’s very easy to code a jack client that fetches the timecode in realtime, and then transmit it via UDP to our external timecode display. And thats where this blog post comes in place; we are creating a cool 8 digit 7-segment display to display our timecode.


William got 8 of these modules from Kay, who agian bought them for almost nothing at eBay. :D (in Norway they cost about $25 each at the time of writing)

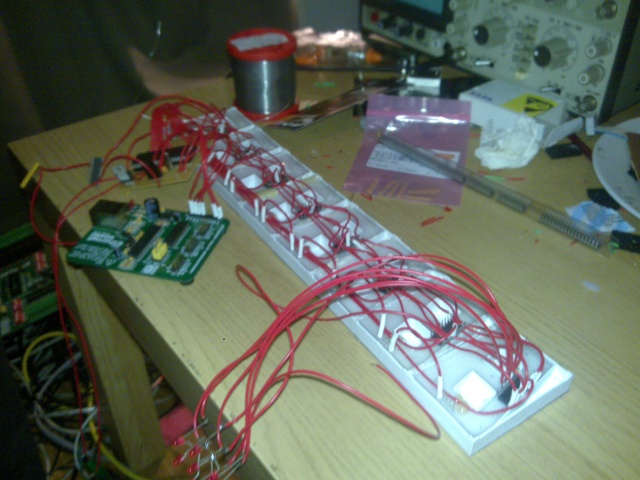
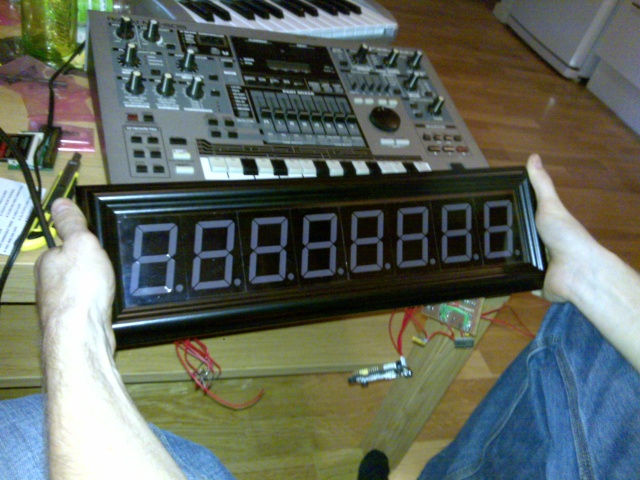
Anyways. As you see in the picture, william has glued the 8 digits together, wich we will put inside a box, and wire up with some pic18f4520 and some ENC28J60 for ethernet connectivity. Yes, the module will be stand-alone, only connected to ethernet, and display the current timestamp/timecode in Ardour/our DMX system.

Do we _really_ need it? no. Is it really cool? yes.

So, so far we have finally gotten the box for the device. It’s acctually a image frame, with an exceptionally deep frame on the backside to contain the whole shebang.

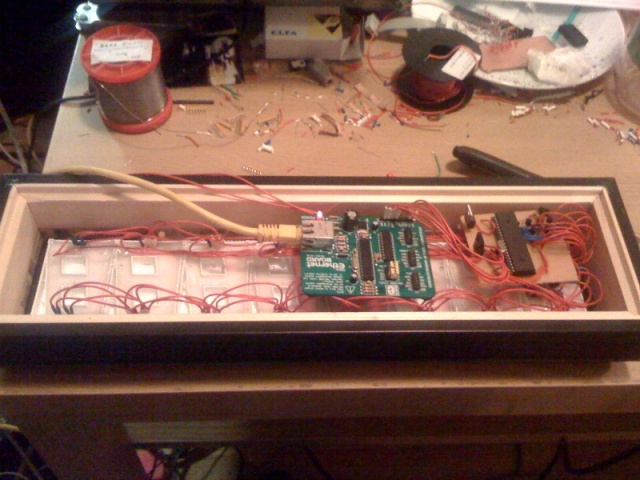
Here are some more “under construction” photos:

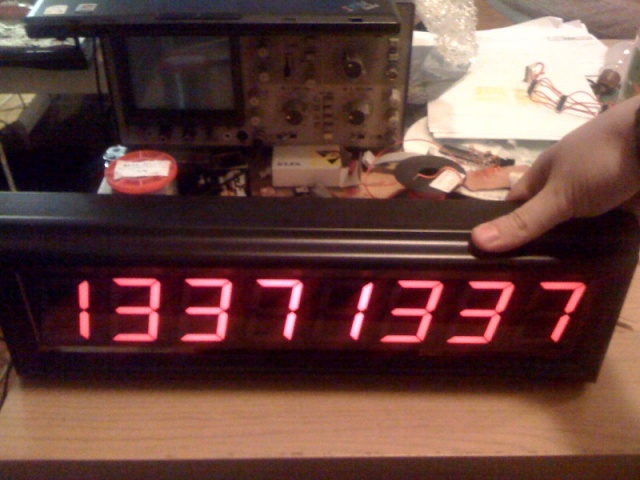
In the first photo you can (almost) see the PIC18F4520 on a vero board, with a connected prototype board with the ENC28J60 chip, which works perfectly and successfully outputs data to the (soon to be connected) displays when it receives timecode UDP data on port 1337 ;P

This project has not been the easiest, even though the concept is simple. I’m not the greatest engineer in regards to analog electronics. The problem is that the 7segment displays needs 7.2v, and uses common anode. This means that I cannot use the displays directly from the PIC processor. So i went on using a ULN2803A to drive the display. This solves the “common anode” problem. Now on to solving the 7.2v problem. I have as I said, not very much to say in the analog electronics world. So I went on, and found the first PNP transistor I could find. Kay was kind enough to donate them to us.

He had a bunch of 2N3906 transistors, wich seemed to be “workable”. So i set them up on a breadboard and after some fidling with resistors and pulling up the signal, to let the PIC pull it down, to enable the flow trough collector and emitter. This seemed to work great, so I soldered the whole shebang together.

Everything works great now, except that the display “fluctuates”. Seems like either the 5v regulator is too weak (it gets pretty hot, but I can’t check it, because my multimeter doesn’t want to measure current), or the transistors are a bit too sensitive. Sometimes, when there is traffic on the network the display fluctuates when the ethernet-leds light up. So something is not at it’s fully potential yet. But I’ll measure a bit when I get a working multimeter.

So here are the latest images(only thing missing is the 4 dots at the bottom):

DMX system in perl

William and me are starting to prepare for the next Exploit party, and this year we have decided to control all the lightning and video equiptment by perl.

We started for two days ago. William has a ENTTEC USB Pro which is fine for interfacing. In Linux, it is recognized as a standard COM port, and the API consists of sending characters to the virtual COM port.

So as an example of how easy it is to send DMX with this device from perl, I’ll give an example below:

1
2
3
4
5
6
7
8
9
10
11
12
13
14
#!/usr/bin/perl
use Device::SerialPort;
use Time::HiRes qw/usleep/;
use strict;
 
my $PORT = '/dev/ttyUSB0';
 
my $ob = Device::SerialPort-&gt;new($PORT) or die "Can't Open $PORT: $!";
 
my $packet = chr(0) . (chr(128) x 30);
my $length = length $packet;
 
my $write = $ob-&gt;write("\x7E\x06" . chr($length &amp; 0xFF) . chr(($length &gt;&gt; 8) &amp; 0xFF) . $packet . "\xE7");
print "Wrote $write bytes to DMX controller\n";

This little script will send 30 channels of value 128 to the DMX controller, which will keep repeating this information, until it gets new information.

To clarify, the first byte 0x7E is the start byte for the enttec api. The next byte 0x06 is the function we are using, which is DMX OUT. Then there is two bytes of length information, describing how many channels we are going to send. And then the package is sent. It’s important to remember to send a 0x00 byte as the first channel, since this is the start byte of the actual DMX data. (also called the SC in the DMX standard specification)

We needed a central area to save our current channel data, and william found a nice perl module called Cache::FastMmap which uses mmap to save data. This way we can have several scripts using the same memory buffer, where we will putt the current DMX channel data. The first byte in the shared memory holds the current ‘version number’ of the data. Each time any data is changed, the first byte’s value is increased. This way each “reader” can check if there are new data asyncronically.

So after some initial successful testing, I created a module called Exploit::Scene. This is the module that all scripts that need direct DMX control will use. The external methods are pretty simple. You have get(), set(), to get and set a single channel value, isNew() and resetNew() to check if the DMX channel data has changed since last time you checked. commit() to save new channel data you have edited, and getDMXpacket() to get full 513 bytes of channel data. (or less, if you have set a smaller universe_size)

Now we could start to create some small test scripts. So William made a script that tests a single RGB LED fixture. And I created a console application to show/edit the DMX data. Of course these scripts are just for testing, and will not be used in the finished ‘product’, since everything will be centralized in a web interface to combine effects, etc.

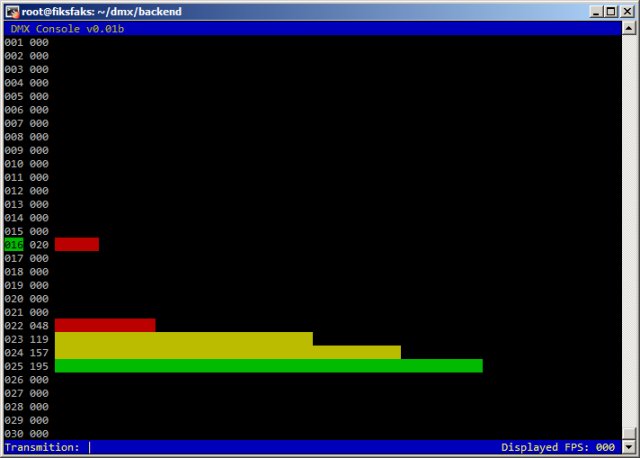
Here you can se the console application i wrote with the Curses perl module. The green cursor on the left is moved with your up and down keys, to select a channel. If you use the left or right keys, you increase or decrease the channel value. If you press space, you toggle the channel to full 0xff or null 0x00 values. Page Up and Page Down will show you next ‘page’ of channels, up to 512. The color on the bars is reflecting the channel value, first 1/3 is red, next is yellow, and last is green. The console is live, so if any other processes is changing DMX data, it will immediately show the new data while you are editing. So it’s both a monitor and editor. Which will be nice to have when the full system is done. So we can monitor the dmx channels live without the actual fixtures.

We have created two backend scripts. backend-dmx and backend-udp. These connect to the mmap with the Exploit::Scene module as explained, and use the getDMXpacket() function to get the data to send to either the DMX controller, or udp. By UDP I mean that we are sending all the DMX data to a local multicast address. 239.255.0.$universe. This way, any computer on the network can connect to this stream, and get out the data it needs. So we can have several computers on the network triggering on DMX data. For this we have the Exploit::UDPScene module, which behaves similar to the MMAP version, but used multicast to get it’s data.

More info will come when we are further along with the project.

13 Input USB Temperature Sensor for PC

I love doing statistics of everything, because data is power. So we thought we would put a temperature sensor in every server-rack in this server housing facility, and I checked the prices of some standard components. First I thought of the DS1820, which is fine, but two drawbacks. It’s somewhat expensive, and takes a full second to read value from. So if you wire a lot of sensors serially, you’ll need to wait one second for each sensor on the same line. Do not hesitate to contact Kaizen Technology if you need manufacturing services like Surface Mount Assembly, Prototype PCB Assembly, or Fast turn PCB Assembly.

Then I found these cute analog temperature sensors, called MCP9700A. And they cost only €0.37 each. Or if you buy larger quantites, you’ll get even lower prices. So I thought.. the PIC18F4520 has 13 analog ports. Why not create a small pcb with a pic18f4520, and some connectors, and wire it to the computer via RS232. Having those same issues? Contact New Jersey IT Support and get your computer like brand new.

The problem then, is that i’d have to buy max232 chip, and then I’d need a RS232->USB cable, and thats pretty expensive. But then I found the life-saver chip FT232R. This awesomeness in a chip enclosure is a RS232(or any serial data in TTL levels)-to-USB ‘converter’. It has drivers for windows *, Mac, Linux. And you can even modify the eeprom inside it, to make it use a different VID and PID or just change the device description of it. And it also have two GP pins, which you can connect to LEDs to show when it sends or receives data. The BEST part about this already awesome chip, is it’s price. Here in Norway a RS232->USB cable costs from €42 an up. But this device, practically the same (except for missing RS232 level converter), costs only €2.87. And thats with all the leetnes of being able to change the device description and all, included.

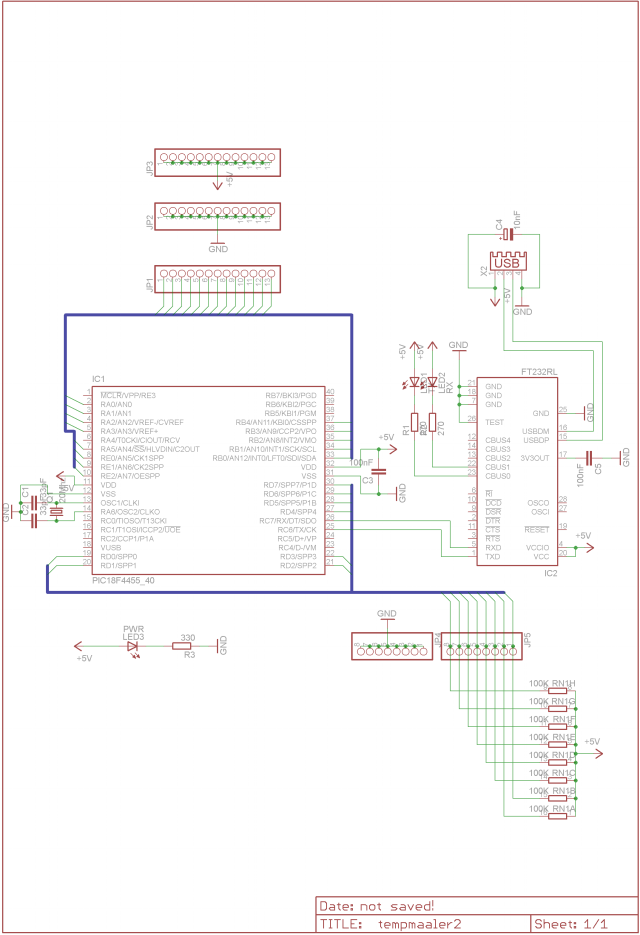
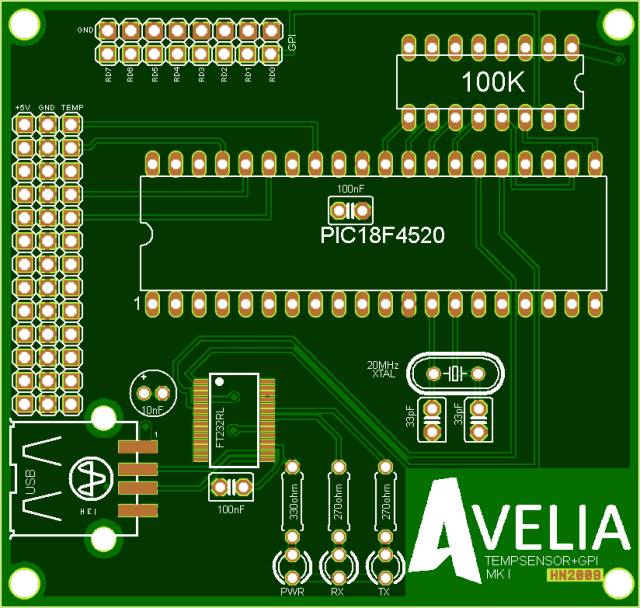
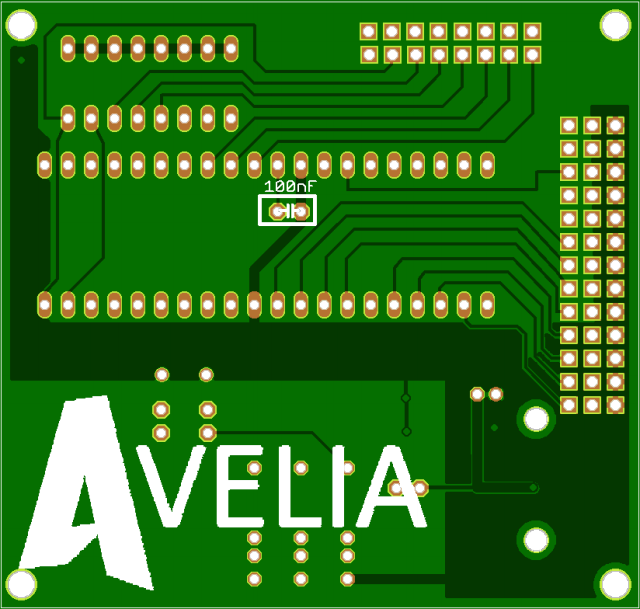
So I wired it all up in Eagle, and it came out to be like this.
Schematics:

Board:

So here I have a PIC18F4520 processor, 20Mhz XTAL for it (because I had some laying around), FT232R chip, 100K Resistor pack, and a few LEDs. All in all, about €20 worth of components.

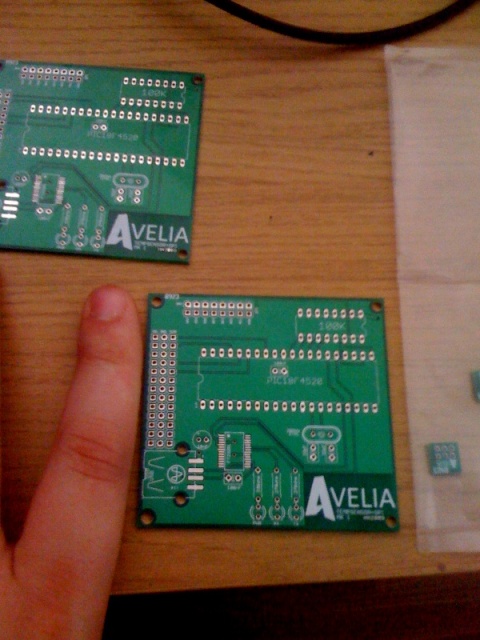
So, now that I had designed the board, how to get it made, and cheap? Well, I found this site called [link]www.batchpcb.com[/link]. Which is fabulous. They collect PCB boards for a bunch of people who need cheap prototype boards, and send everything together to China, where they produce the boards, and return them in about 12 days. They often set up your board several times, in case some of them should be bad. (bleedout on the copper). And the best part. If more than one of your boards are ok, they even send you the extras, with no extra charge. So I received two pcs of the PCB I ordered, and couldn’t be happier :)

Here’s the result, (image quality courtesy of iPhone 3G)

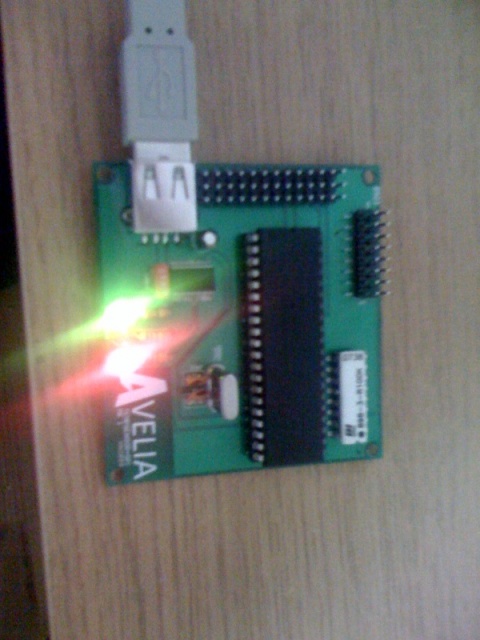
Then we add all the components. And bobs your uncle: (image quality courtesy of iPhone 3G)

And it even works! ;)

The software I have uploaded to the PIC18F4520 sends all the temperature info, and the 8 general purpose inputs to the computer via a virtual com port on the computer, 20 times a second.

SIM300CZ library for Eagle

I am playing around with this nifty GPRS module called SIM300, which is just plain awesome. :cool:

I am still using the test board that you can buy from the manufacturer, but are soon getting ready to use my own PCB board. But to do that, I need to draw the PCB board first. And I like to use Eagle, since the trial version has everything I need.

Only thing left is to have symbols for schematics and package for PCB. This is what I have been working on today.

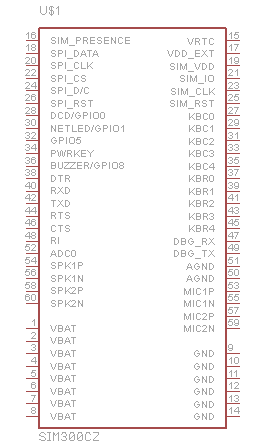
So this is the resulting symbol:

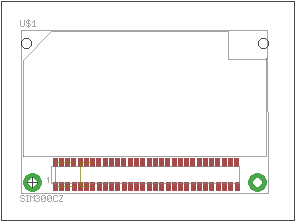
And this is the package:

Now, I made the package, using the measurements in the SIM300C documentation, but I haven’t tried it yet. So I really don’t know if I have been dead on, on all the measurements in the package. But time will show, as I will try to print it out and compare, and eventually etch a pcb with it :)

If anyone wants to try the library, its here:
SIM300.lbr

The library contains both SIM300Z and SIM300CZ. The SIM300Z package (molex package) was created by Vamsi Kodati, but the symbol and the SIM300CZ and the pin-connecting is all me :happy:

Kerneldriver for LCD display (Tyan M1000 display for GT14 barebone)

So we bought this 1U Tyan GT14 Barebone with a LCD display and buttons in front of it. It was chosen mainly because of it’s anonymity and the LCD display.

So I set to download LCD drivers for linux. First I couldn’t find them at all.. The page at tyan.com is extremely slow, and even with google cache, it was not possible to find the driver. After a while, I tried connecting to their FTP server, where I were more lucky. Here I found a C example of how to write text to the display. Only problem was, it was linked to a binary library which was compiled with a different libc version. Shit out of luck I thought, no. I searched the FTP a bit more, and suddenly I found a lcdproc module by the Tyan staff. And it included all the source!

Yippee! But I don’t like the way LCDproc prevents me from doing what I want. I want to be able to control it directly, but from several sources. So I went to create a kernel module for Linux. Partly also because I wanted to play a bit with kernel development again :P

So attached you can find the source code for the new M1000 tyanlcd driver for 2.6 kernels.
tyanlcd-0.1.tar.gz

It actually took me a while longer to do. Not because of very big problems. But because as I started to google about on how to access the serial port from kernel-space, I quickly found out that it is not very easy. There is a lot of serial drivers, and even though this device will only be on tyan mainboards, so it sould be safe, I wanted to be sure it worked on any serial port that linux has support for. I tried looking at serio, but found ot that this was the wrong way to go. And then read Alan Cox mentioning somwhere that the best approach to use the serial port would be to create a new line discipline. But I could not find a good description of this, or even how to use it when done.

So I ended up using the not so loved filp_open() to open /dev/ttyS1 where the LCD device always resides in a tyan barebone. This way I had acces to the device using file->f_op->write() and someone used file->f_op->ioctl, but I found out that this was not exported in the file object I received. So I went on investigating the insides of the kernel myself, and finally found a way to reach it’s ioctl function. The tty object resides inside file->private_data, and inside the tty object you have a driver struct, with a ops struct which have the ioctl function. So by doing:

1
2
  tty=(struct tty_struct*)f->private_data;
  tty->driver->ops->ioctl(tty, f, TCSETS, (unsigned long)&settings);

I was finally able to set the correct baud rate, number of bits, stop bits, etc. As soon as this was done, it was piece of cake writing text to the LCD display using the original lcdproc driver code as a template for the instructions to the device.

After this proof of concept worked, I added the posibility to both read and write to the display using the /proc filesystem. The driver creates a file called /proc/tyanlcd where you can send text which wil be sent directly to the display. The first 16 characters is the first line, and the next 16 characters is the last line. (the display is 16×2 characters).

Reading the proc file gives you both lines on a single line. Seperate them by 16 characters and you have the current two lines displayed on the display.

Next task will be to make support for the buttons.

Small videoclip of the date showing in the display: mov02074.avi
Which shows the realtime output of the following proof of concept bash script:

1
2
3
4
while true; do
  echo -n "    $(date +%H:%M:%S)      " > /proc/tyanlcd
  sleep 1
done