Archive for the ‘perl’ Category

DMX Light control system

Every year, I team up with raider.no to arrange a party in Hurdalen, or around the Oslo area. And one of the things that is important for us (especially me and William), is to create a cool opening show, using our own innovative technology. We don’t have a lot of money in the organization, so we tend to also develop stuff that already exists.

This year, we wanted to do the timing of the show entirely in our own system, as we weren’t satisfied with the Avolites Pearl systems own “show timing” system.

So we split up the task in two daemons and a GUI. The two daemons are written in C, and the GUI in Perl (using the Catalyst Framework).
The first deamon is the “DMX daemon”, which handles existing DMX data from the Pearl mixer as the rest of the night will be run from this board. This is transferred via network over the ArtNet protocol. It also listens for our own udp DMX-commands, which includes simple operations like, fade (linear), blink, subtract, add, etc. These functions allows external scripts and programs to send simple commands to control the lights. For example “fade channel 1 from 0 to 255 in 2 seconds”. Which would then automatically execute, without the client having do anything more. You can also group together a bunch of actions in a “transaction”, and then have it execute as soon as you send the “end transaction” command. The resulting DMX data is sent to the Enttec DMX dongle connected to this computer. The system is so lightweight, that there was no noticeable delay from using ArtNet->DMXDaemon->EnttecDongle over network, than using the direct DMX output from the board. The nice thing is that, if we want, the show daemon can forcibly stop all data from the Pearl mixer, or even alter the data using add/subtract/max/min commands.

The next daemon is the show daemon, this takes complete scripted shows from the database (created by the GUI), and converts them to commands to be sent to the DMX daemon. This daemon uses (lib)jackd2 to fire events at the exact time according to the sound file playing in a external program like Ardour, which sends timecodes via jackd. The show daemon has functions to group together effects that will be executed at specific timestamps.

Here’s a link to a overview of how we wired it all up for the show.

The whole system is kept open-source at github.

Simple Perl based Icecast clone

This is acctually a mini project I did a while ago, but I thought I could write a small post about it here, and give out the source code.

The reason I did this, was because I used icecast, and had 5 streams up with a lot of users, but sometimes you would get sound from other streams on the same server, or old sound in the middle of the stream. I tried googling after other people with the same problems as me. But found nothing. So I thought; it’s quite simple software, how hard can it be to make a stable myself?

So first I made a proof-of-concept perl script to receive data, and send out to several listeners. Worked great at first try. Only a minior problems. If I paused the stream on one client, the whole server started waiting for that one listener, before sending any more data to all the other listeners. (more about this later) The other problem was that I didn’t have any in-stream “title” support.

The reason the stream stopped when one of the clients stopped listening for data (and blocked further data), is that I was sending data with a blocking socket. Now I tried googling about how to _send_ nonblocking, but coulnd’t find anything. So I made my own little workaround. (someone please give me a better solution)

Instead of:

$sock->syswrite($data)

I wrote a new send subroutine using IO::Select to check if the client is ready for data:

sub send {
	my $self = shift;
	my $sock = $self->{'sock'};
	my $data = shift;
 
	my $select = IO::Select->new;
	$select->add($sock);
	if ($select->can_write(0)) {
		return $sock->syswrite($data);
	} else {
		return 0;
	}
}

This finally did the work for me. The “send()” subroutine now returns how many bytes it sent to the client, and if it couldn’t send any, then it returns zero of course.

Then over to the problem of sending title updates inside the stream. I googled this and found a nice informative page about Shoutcast MetaData.  To bring it into a short explanation; if the client supports shoutcast metadata, it sends the following request header “Icy-MetaData:1” to inform the server that it knows about metadata. Then the server, my script, sends “icy-metaint: 123” back in the response header, where “123” is the amount of mp3 bytes before a metadata string should arrive. After exactly 123 (or whatever the server decides) bytes, the server sends a byte containing information about how long the metadata block is, and then the metadata right after. The “length byte” must be multiplied by 16 to get the real length of the metadata string. So the largest metadata string possible would be 4096 bytes long. Just after the metadata, the mp3 data continues as usual. Usually you won’t send the title data each time the metaint-counter goes around. You’re probably good by sending zero length metadata (just sending a ‘\0’ byte as metadata-length) all the time, until the title actually changes.

So at this time I rewrote the script, and mode it more module based, and added support for several streams, and yaml configuration file for access control, and some status pages, using TemplateToolkit.

So anyways, the script is still in early beta stage, but it should work fluently. It did however seem that the title-data got out of sync after about a day of listening to a stream, until you reconnected. Can’t seem to understand how it would get out of sync, unless a malformed tcp packet would arrive. So either I was testing it with a really crappy internet connection that time, or there is a bug berried deep in the simple code. You are free to have fun with the script, and tell me whats wrong. I also think it’s still full of debug printing. But I have already warned you, this is still in the proof of concept “whack-some-shit-together” stage. I’ts just one of those projects that ends up collecting dust.

If you fire the script up, and go to http://127.0.0.1:8001/ it should give you a list of the current connected streams. Also http://127.0.0.1:8001/xml should give you xml output of current streams. I’ve been using oddcast to send icecast stream to it.

Here’s the full script: perlcast.tar

DMX system in perl

William and me are starting to prepare for the next Exploit party, and this year we have decided to control all the lightning and video equiptment by perl.

We started for two days ago. William has a ENTTEC USB Pro which is fine for interfacing. In Linux, it is recognized as a standard COM port, and the API consists of sending characters to the virtual COM port.

So as an example of how easy it is to send DMX with this device from perl, I’ll give an example below:

1
2
3
4
5
6
7
8
9
10
11
12
13
14
#!/usr/bin/perl
use Device::SerialPort;
use Time::HiRes qw/usleep/;
use strict;
 
my $PORT = '/dev/ttyUSB0';
 
my $ob = Device::SerialPort->new($PORT) or die "Can't Open $PORT: $!";
 
my $packet = chr(0) . (chr(128) x 30);
my $length = length $packet;
 
my $write = $ob->write("\x7E\x06" . chr($length & 0xFF) . chr(($length >> 8) & 0xFF) . $packet . "\xE7");
print "Wrote $write bytes to DMX controller\n";

This little script will send 30 channels of value 128 to the DMX controller, which will keep repeating this information, until it gets new information.

To clarify, the first byte 0x7E is the start byte for the enttec api. The next byte 0x06 is the function we are using, which is DMX OUT. Then there is two bytes of length information, describing how many channels we are going to send. And then the package is sent. It’s important to remember to send a 0x00 byte as the first channel, since this is the start byte of the actual DMX data. (also called the SC in the DMX standard specification)

We needed a central area to save our current channel data, and william found a nice perl module called Cache::FastMmap which uses mmap to save data. This way we can have several scripts using the same memory buffer, where we will putt the current DMX channel data. The first byte in the shared memory holds the current ‘version number’ of the data. Each time any data is changed, the first byte’s value is increased. This way each “reader” can check if there are new data asyncronically.

So after some initial successful testing, I created a module called Exploit::Scene. This is the module that all scripts that need direct DMX control will use. The external methods are pretty simple. You have get(), set(), to get and set a single channel value, isNew() and resetNew() to check if the DMX channel data has changed since last time you checked. commit() to save new channel data you have edited, and getDMXpacket() to get full 513 bytes of channel data. (or less, if you have set a smaller universe_size)

Now we could start to create some small test scripts. So William made a script that tests a single RGB LED fixture. And I created a console application to show/edit the DMX data. Of course these scripts are just for testing, and will not be used in the finished ‘product’, since everything will be centralized in a web interface to combine effects, etc.

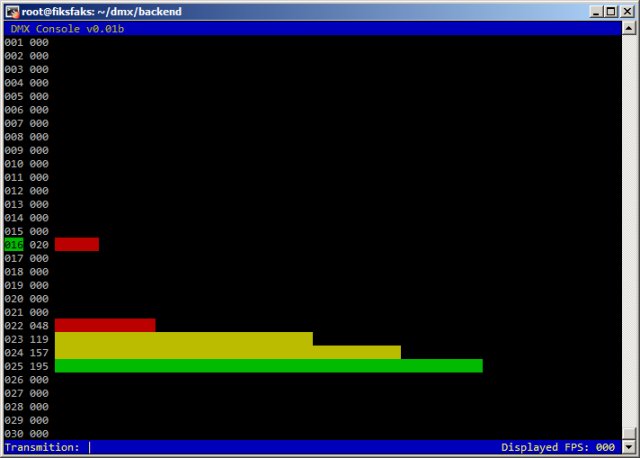
Here you can se the console application i wrote with the Curses perl module. The green cursor on the left is moved with your up and down keys, to select a channel. If you use the left or right keys, you increase or decrease the channel value. If you press space, you toggle the channel to full 0xff or null 0x00 values. Page Up and Page Down will show you next ‘page’ of channels, up to 512. The color on the bars is reflecting the channel value, first 1/3 is red, next is yellow, and last is green. The console is live, so if any other processes is changing DMX data, it will immediately show the new data while you are editing. So it’s both a monitor and editor. Which will be nice to have when the full system is done. So we can monitor the dmx channels live without the actual fixtures.

We have created two backend scripts. backend-dmx and backend-udp. These connect to the mmap with the Exploit::Scene module as explained, and use the getDMXpacket() function to get the data to send to either the DMX controller, or udp. By UDP I mean that we are sending all the DMX data to a local multicast address. 239.255.0.$universe. This way, any computer on the network can connect to this stream, and get out the data it needs. So we can have several computers on the network triggering on DMX data. For this we have the Exploit::UDPScene module, which behaves similar to the MMAP version, but used multicast to get it’s data.

More info will come when we are further along with the project.